Showing posts with label fuzzies. Show all posts

Wednesday, April 10, 2013

It's a wrap...

...in more ways than one.

I have been studying yoga on and off since my college years. For the past five years, I have been studying with Tiny Dancer, a teacher who leads an interesting and varied practice at our synagogue.

Tiny Dancer knows that I make jewelry. After class one day she asked me to take a look at a bracelet that she had owned for several years but could not wear. The bracelet was made up of five strands of turquoise and silver beads with a clasp closure and it was far too big for Tiny Dancer's wrist. At first we talked about shortening the existing bracelet, which would have been possible but not much of a challenge. After looking at the lovely turquoise beads, I asked Tiny Dancer if I could take the bracelet apart and use the beads to make something entirely new. She gave me permission to cut apart the strands to make a wrap bracelet.

(Sorry to say that I did not think to take a photo of the 'before' stage. My only excuse is that I was just itching to unbuild that thing as soon as I got home.)

I have made wrap bracelets in the past using small round beads stitched to leather or cotton cord. Tiny Dancer's original bracelet had both small and very large beads. I wire-wrapped the larger beads and added them along the sides of the wrap bracelet. It almost gives a charm bracelet look to the piece:


I now need to measure the bracelet on Tiny Dancer's wrist to make sure that it fits perfectly, so the fuzzies and the needle are still visible in this work-in-progress view. The silvertone rectangle near the left is a button that acts as the closure. The beaded cord wraps several times around the wrist and there is a loop in the cord at the other end. The bead slips through the loop.
 
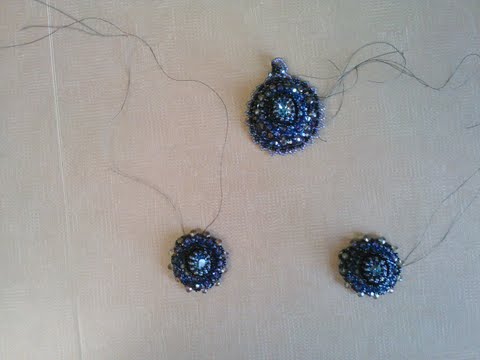
After the bracelet was at the stage shown above, I used some of the remaining beads to make a pair of earrings:
 
I played around with including a length of the brown leather cord in the earring design but even small pieces were too dramatic to play nicely with the other elements.
 
And there were even enough remaining beads to make a necklace:
 
The center of the necklace is make of knotted leather cord that is woven through wire eye pins. It somewhat mimics the feel of the wrap bracelet without being matchy-matchy.
 
I need to cut the chain and add a closure once I see how long Tiny Dancer wants to wear the necklace. I saved the clasp from the bracelet, which means that I was able to re-use everything from the original, unwearable item except the wire that strung it all together.
 
We will meet for lunch next week Tiny Dancer and I, so that she can see what her old bracelet has become. Here's hoping she likes all three pieces. Since she is expecting only a wrap bracelet the additional earrings and necklace should be a nice surprise.
 
The other thing that is a wrap: my day job. After seven years at the same job, I have resigned. Like most things in life this decision involved a complex web of inter-related issues that I won't delve into here. Suffice it to say that I will have a lot more free time for beading and blogging.


Wednesday, February 13, 2013

Change is good...sometimes

The New Year has proven very busy with lots of changes and more on the horizon.

I was able to start a new beading project last week. Sometimes, when I am not feeling particularly moved to create something from scratch, I keep up my skills by following a set of published instructions in a magazine. Sometimes I follow the instructions exactly and sometimes I make changes. Usually the changes work well. This is an example of making a change that has created a challenge for the finished piece.

The design is called 'Machu Picchu Jewels' and is from a recent issue of Beadwork Magazine. The design calls for small drops at the bottom of the necklace. Because I had some larger drops that I was just dying to use, I substituted them for the suggested size of drops.

This is what the work in progress looks like:


This is such a pretty, delicate design. The drops that I swapped are the clear, iridescent ones along the lower edge of the piece. It looks fine in this configuration. But, remember, this is supposed to be a necklace. When I spread out the beadwork in the sort of arc that a necklace would assume when worn, it looks like this:


Notice that the three large drops are all bunched up together and that the prettiest part of the design, the oval pear with a fan-shaped embellishment, is covered up. The tip of the scissors is pointing towards the worst of the bunching.

Rather than undo all of this work, I will finish this piece and make it into a bracelet rather than a necklace. In bracelet form it will be able to retain the curvature that works best. When I start again on a necklace with this pattern I will be sure to use the size of drops that are called for by the designer.

Experimenting is good and it is the only way that we grow as artists. But you also have to realize when a departure from the rules is working against you. When I finish both the necklace and the bracelet I'll post photos of them side by side so you this pattern as the designer intended.

Wednesday, December 19, 2012

Saturday Morning Cartoons


This may be hard for younger folk to believe, but there was a time before DVRs or TV-on-demand internet services. There was an even more distant time before VCRs. It was an era when, if you wanted to watch a particular television show, you had to be sitting in front of the set when it aired.

During this primitive time, the most important TV viewing time for kids was Saturday morning. This was the only time that all of the major networks showed cartoons for hours on end. There were prime-time cartoons during the week, like The Flintstones and The Jetsons, but for a dizzying glut of animated slapstick and mayhem, it was all about Saturday morning.

I have a visceral memory of flopping on a bean bag chair in the den of my childhood home just as Saturday morning cartoons were about to begin. That sense of anticipation is something that I did not experience again regarding a television show until many years later when my daughters Kage and Smallest of All got me hooked on (bwah!) Project Runway.

A consistent favorite during the Saturday morning cartoon era was any Looney Tunes cartoon: Bugs & Daffy (Wabbit Season! Duck Season!), Marvin the Martian (I am sooooo angry!), Michigan J. Frog (Hello my honey, hello my baby!). But for dialog-free, surreal cartoon bliss, there was nothing like The Roadrunner.

The great Chuck Jones directed many (if not most) of the Roadrunner cartoons. He crafted the complex and doomed methods that Wile E. Coyote devised (with help from The Acme Corporation, of course) to capture (or obliterate) the Roadrunner. He gave us a stylized, gorgeous view of the American southwest desert landscape that served as the backdrop for the Coyote’s never-ending pursuit of his prey. Chuck Jones taught us that, in the cartoon world, you could run across thin air for exactly as long as you didn’t look down.

An actual roadrunner looks very little like the purple, soft-edged Warner Brothers version. They look like this:
 

The Gruffalo and I enjoy spending leisure time in the desert, and roadrunners are a frequent sight. With their Mohawk-like crest, long legs, skinny frame and nervously peeved demeanor they resemble nothing so much as punk-rock chickens. They have a distinctive call which does not sound anything like ‘meep meep’.

This piece, a project-in-process, is called Roadrunner. I started it after a weekend walk with the dogs that included several roadrunner sightings. The shape is elongated and spiky, the colors are desert-like and the saturated orange tile beads are reminiscent of cartoon hues without being too extreme. I plan on adding long feather-shaped orange drops along the bottom of the necklace.


The colors and angles of this piece are a departure from my usual preferred hues and shapes. It is also woven in a set pattern of alternate opaque and translucent beads. This type of pattern is much easier to stitch than a random placement of colors. Whenever I am doing a random placement I have to think much harder than when I am following a pattern. Making a combination of colors look random is not as easy as it sounds; you have to pay attention to the way that the various rows & columns combine to avoid large blocks of a single color. Following a simple pattern like this allows my mind to wander while I bead. In fact, my mind wandered a bit too much and one side is longer than the other by two rows, so I have to unbead a little before I go on.

The translucent bead color in Roadrunner is called 'root beer' by Tila. Every time I read the side of the bead container I want a root beer float. Perhaps I will drive through A&W on the way home tonight--or maybe I'll use 'root beer float' as my next inspiration. 

Wednesday, November 28, 2012

Owl Be Seeing You


The Gruffalo and I live in what is called ‘an urban/wild land interface’. It is one of many pockets around the Los Angeles area that consist of homes located in, well, the wild land. We are not far outside of the nearest city but where we live feels very much like the country.

We are surrounded by wildlife; sunbathing lizards, suicidal squirrels, lawn ornament rabbits, fat & sassy coyotes, gate-crashing rattlesnakes (they prefer to coil themselves on back porches, we have learned), shy foxes (only glimpsed twice), tufty bobcats, sashaying skunks, cranky raccoons, soaring hawks and, once, two horses that had left their stable and were chilling in our front yard. The bats are coming back to our part of the world. They left the area after the Medfly insecticide spraying in the 1970s killed off much of their food supply. It has taken decades for the bats to return and their presence is very welcome. They keep the swarms of little annoying black valley flies under control.

The first time that I cared for The Gruffalo when he had a bad cold, I told him that he looked like a peeved owl, and he really did. Wide eyes, wild hair sticking straight up in a crest, look of intense concentration. Since that time, the owl has become my spirit animal whenever someone is sick. When The Gruffalo was hospitalized with a serious illness I wore an owl-emblazoned bracelet every day.

There is one owl in our neighborhood who escorts me along the road to our home when I drive home at night. I am not making this up. This owl will swoop into sight and fly just ahead of my car until I drive into my garage. It has happened often enough that I can’t dismiss it as coincidence. I mentally refer to him as my Guardian Owl and I wave ‘thanks’ to him every time he leads me home.


The piece pictured above is made of tile beads with an iridescent owl bead in the center. It represents a stylized tree trunk with my Guardian Owl perched in a knothole. I am almost finished with one side of the twisted rope necklace that will complete the piece.

Wednesday, November 21, 2012

Corona del Mar


Corona del Mar means ‘crown of the sea’. To my family it also means lovely memories; Mom would often pack a picnic lunch and take my sisters and me to the beach during the summer months.  Actually, the phrase ‘picnic lunch’ barely does Mom justice. My mother was (still is) a dynamic combination of Betty Crocker and Donna Reed. Beach lunches usually consisted of fried chicken, potato salad and cookies, everything home-made and all eaten from a plate using a knife & fork. The inevitable slight sprinkling of sand that would stick to our food is probably the reason that I only like extra-crispy fried chicken to this day.

By the way, I have noticed that there appears to be a tradition in the blogging community to give nicknames to real people that one writes about. In my world, every family member, friend and pet has multiple nicknames so the chore will be to choose which nickname to use for each person. That is, except for my youngest sister, Barf being just too good to pass up.

There is a main beach at Corona del Mar, and there is a sheltered lagoon behind a jetty. Depending on the tide there is a small, shifting lagoon-side spit of exposed sand. People who climb over the jetty are not always certain of having a dry place to lay out their beach towels, but the peaceful beauty of this little corner of the ocean is worth the hike.

These two pieces are named after the beaches of Corona del Mar. I am very much in love with ocean blues & greens. I often combine these tones in my designs. While stitching these two companion pieces I imagined tide pool life viewed through the lens of undulating sea water.

The collar necklace is called Big Corona (what the locals call the main beach):


And the cuff bracelet is called Little Corona (the moniker for the lagoon):


Little Corona is finished & ready to wear. Big Corona is not completely beaded. Once the beading on the front is complete I will cover the reverse side of the piece with Ultrasuede ®, stitch a picot border around the entire edge and add a chain or other closure. If you look closely at Big Corona you will see that the beading is done over a piece of printed fabric, in this case a swirly batik. The printed fabric is attached to an underlying stiff white stabilizing fabric.

This is a good opportunity to write about one of my favorite teachers, the late Melanie Doerman. I took a bead embroidery class from Melanie at Brea Bead Works several years ago, and it was a revelation. The value of the class went far beyond learning mere technique. Melanie also taught a way of looking at things in a slightly different way that allowed me to loosen up and trust my own creativity. For example, the idea of attaching a printed fabric to the stabilizer is hers, and it is a brilliant way to avoid the possible paralysis created by facing a blank canvas.

Melanie called herself The Magpie, and this was the name of her website. The site has been taken down since her passing earlier this year but you can take a look at her last published book at Amazon.

Since I tend to fall in love with one color combination to the exclusion of all others, it was a relief to hear Melanie admit to this same sort of obsession during class. At that time she was enamored of bronze seed beads and was using them to cover a large jar to create an elaborately embellished container. She told us that the project was taking more beads and more time than she had imagined, but that she never got tired of those little bronze beads.

Magpie, thank you so much for your generous creative spirit. I hope you finished that project.

Picot:  In clothing design, a picot refers to a loop, usually made of thread or ribbon. It can be either decorative or functional. In beading, a picot is a stitch usually used for edging. The stitch uses three beads combined in such a way that the middle bead pops up above the beads that surround it.

Batik: Cloth that is traditionally made using a wax-resist method to create designs. Motifs usually represent the natural world, especially flowers & plants.

Wednesday, November 14, 2012

Sugarplum


This photo is of a suite (a group of related jewelry items meant to be worn together) that consists of a pendant & earrings. I need to add the loops for ear wires to the earrings and drops at the bottom of all three pieces. Because of the color combination I am calling this suite Sugarplum.

This is a work in progress, so there are fuzzies galore—lengths of thread that need to be tied & cut.

The design for this suite is adapted  from a pattern published in a beading magazine. I changed it by removing the pearls from the design and changing the stitching around the central stone.

A few jewelry terms:

Montee: A stone that is set (mounted) in a metal fitting. The central stone in these pieces is an oval montee with four small holes at the bottom of the metal fitting. These holes allow the stone to be stitched in place through the back of the montee so that the stitching does not show. The stone of a montee is usually set in the metal fitting so that there is some space between the back of the stone and the metal fitting to allow light to shine through the stone.

Bail: The loop at the top of a pendant or focal piece that allows for addition of a necklace. Bails are usually metal. Metal bails can be an integral part of the bezel (see below) or they can be glued in place on stones that are not bezeled. In these pieces the bail is stitched from seed beads. Only the pendant has a bail (so far). I will add a small bail at the top of the earrings so that I can hang them from an ear wire.

Bezel: The area around a stone or other focal piece. In fine jewelry the bezel is metal that is formed around gemstones. The bezels around the montees in Sugarplum are stitched from seed beads.

Bicone: One of the many, many available shapes of crystal. A bicone is shaped like two pyramids stuck together at the base. They come in a variety of sizes. The smaller crystals in Sugarplum are 3mm bicones.

Rondelle: Yet another crystal shape. Think of a perfectly round crystal that has been squished. The diameter is larger than the length of the crystal. The stringing direction is through the shorter dimension. The larger crystals (hard to see, because they are a light smoke color) in Sugarplum are 4mm X 6mm rondelles.

I am undecided about the drops for these pieces. The pattern that I used calls for a fairly large drop (a series of beads that hang from the bottom of a piece) on the pendant and smaller ones on the earrings, but I might leave the pieces as they are.
When the focal point of a necklace is so intricate I use a very simple necklace, either a length of ribbon or a plain metal chain. I will try both with this suite and publish a photo of the final result.

Monday, November 12, 2012

Cleo


This is a piece that I just finished last week. It is made with square glass two-hole tile beads called 'czechmates'. The gold beads are black on the other side, so the necklace is reversable.

This photo shows the many threads that still need to be woven back into the piece. It would probably make more sense to weave them in as I go along, but I just can't stop beading when I really get going. I wait until the very last step to weave & trim the fuzzies.

The final necklace will have a chain attached with a clasp in the back. I originally was going for an Art Deco feeling but I think the finished product looks more Egyptian, so I am calling this Cleo. I want to make a jagged-edge cuff to go with this.

As much as I love the tile beads I cannot for the life of me figure out nice earring designs to go with the necklaces that I've made. These beads are not lightweight, so any earring that I make from them has to use only a few beads or they will be too heavy. I also tend to think that, with a really bold statement necklace, you don't need attention-getting earrings (but maybe I am just rationalizing to cover up my lack of good earring ideas).

I have an idea to design & make a wall hanging out of these beads. It would be like making a stitched mosaic. Again, however, it will end up being a very heavy piece. The thread that I use is a form of fishing line, so I suspect that it would hold up well, but the wall might not.

Bead Here Now

I grew up in a Southern California town that is so close to Disneyland that we could watch their nightly summer fireworks from our driveway. The Bowers Museum in Santa Ana was a frequent weekend destination for my parents, my sisters and me. My most vivid memory is of the various beaded items in the Native American displays. I used to have dreams about being able to go inside the display cases to examine the beaded adornments more closely.

When I was about 9 years old, I saved up for a kit that included a wood & metal loom, needles, thread, seed beads and instructions for beaded patterns. The instructions were beyond confusing. The only thread included with the kit was white, and it very quickly got soiled & frayed from my constant pulling out & re-stitching rows. The headband that I (finally) completed was a truly horrible thing, even for a first attempt and I set the loom aside, convinced that I had no skill for this particular type of craft.

My Mom is an accomplished seamstress with great creative instincts, and she taught me to sew and embroider after I abandoned my bead-weaving loom. I continued to sew for myself and, later, for my kids. Sewing, especially hand-sewing, was a wonderful creative outlet for many years.

Then, five years ago, my husband The Gruffalo became gravely ill. I spent more time in the hospital than at home. Reading was impossible, and even the most tiny sewing project was too bulky to tote back and forth to the hospital. A few weeks before my husband got sick I had taken a bead weaving class at my local bead shop. Bead weaving projects are eminently portable: a few tubes of seed beads, needle & thread take up very little space. The pattern I had learned was just distracting enough to take my mind off the beeping and blaring of hospital equipment. I could set aside the project at a moment’s notice to follow my husband into radiology for yet another test. In those tense weeks spent watching over my husband I re-discovered my childhood love of beaded things.

My husband got better, slowly, and came home to finish recovering. I took more classes, learned more stitches and acquired (ahem) a few more beads. Scratch even a casual beader and you will find a magpie with an insatiable hunger for little shiny trinkets. In fact, one of my favorite teachers (more about her in later posts) called herself The Magpie online. The Gruffalo, now fully recovered, arches an eyebrow when I tell him that I have to go to the bead shop and says “Yes. I was getting worried that you might run out.”

My repertoire of skills now includes wire wrapping and metal clay techniques, but I keep coming back to bead weaving. It allows me to produce pieces that I can gift or sell while still delighting the 9-year-old girl inside of me who wanted nothing more than to get closer to the intricate, intoxicating beadwork on display at The Bowers Museum.

It has only been very recently that I have taken the stitches and techniques I have learned and started to design my own pieces. Sometimes I will start with a published pattern and make modifications based on my own taste, other times I will start with a pile of beads and no idea what the finished piece will be.

The purpose of this blog is to write about beading and to post photos of my projects, including work in progress. I’m happy to address any comments about my work as long as the criticism provided is constructive. Tips, techniques, resources, pitfalls and personal stories will all be fair game for blog posts and comments. I hope you enjoy and can join the conversation.